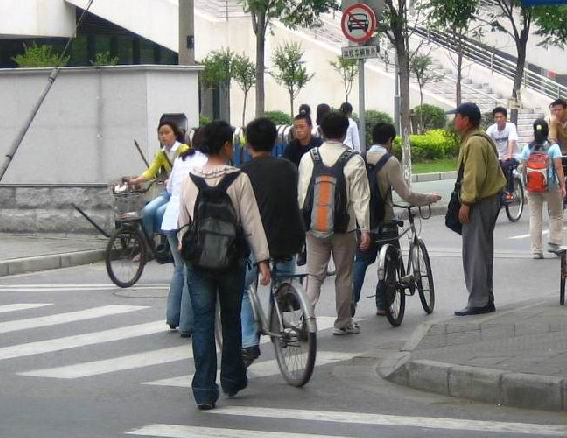
For this tutorial, we will be finetuning a pre-trained Mask R-CNN model in the Penn-Fudan Database for Pedestrian Detection and Segmentation. It contains 170 images with 345 instances of pedestrians, and we will use it to illustrate how to use the new features in torchvision in order to train an instance segmentation model on a custom dataset.
The reference scripts for training object detection, instance segmentation and person keypoint detection allows for easily supporting adding new custom datasets. The dataset should inherit from the standard torch.utils.data.Dataset class, and implement __len__ and __getitem__.
The only specificity that we require is that the dataset __getitem__ should return: * image: a PIL Image of size (H, W) * target: a dict containing the following fields * boxes (FloatTensor[N, 4]): the coordinates of the N bounding boxes in [x0, y0, x1, y1] format, ranging from 0 to W and 0 to H * labels (Int64Tensor[N]): the label for each bounding box * image_id (Int64Tensor[1]): an image identifier. It should be unique between all the images in the dataset, and is used during evaluation * area (Tensor[N]): The area of the bounding box. This is used during evaluation with the COCO metric, to separate the metric scores between small, medium and large boxes. * iscrowd (UInt8Tensor[N]): instances with iscrowd=True will be ignored during evaluation. * (optionally) masks (UInt8Tensor[N, H, W]): The segmentation masks for each one of the objects * (optionally) keypoints (FloatTensor[N, K, 3]): For each one of the N objects, it contains the K keypoints in [x, y, visibility] format, defining the object. visibility=0 means that the keypoint is not visible. Note that for data augmentation, the notion of flipping a keypoint is dependent on the data representation, and you should probably adapt references/detection/transforms.py for your new keypoint representation
area (Tensor[N]):边界框面积。这在使用COCO指标进行评估时使用,用于区分小、中、大框之间的指标得分
iscrowd (UInt8Tensor[N]):iscrowd=True的实例将在评估期间被忽略
(可选) masks (UInt8Tensor[N, H, W]):每个目标的分割掩码
(可选) keypoints (FloatTensor[N, K, 3]):对于N个对象中的每一个,它包含[x, y, visibility]格式的K个关键点,用于定义对象。visibility=0表示关键点不可见。注意,对于数据扩充,翻转关键点的概念取决于数据表示,你应该为新的关键点表示调整references/detection/transforms.py
If your model returns the above methods, they will make it work for both training and evaluation, and will use the evaluation scripts from pycocotools.
自定义的上述方法能够既适用于训练也适用于评估,其中评估使用的是来自pycocotools的评估脚本
Additionally, if you want to use aspect ratio grouping during training (so that each batch only contains images with similar aspect ratio), then it is recommended to also implement a get_height_and_width method, which returns the height and the width of the image. If this method is not provided, we query all elements of the dataset via __getitem__ , which loads the image in memory and is slower than if a custom method is provided.
Here is one example of a pair of images and segmentation masks
下面是一对图像和分割掩码的示例
So each image has a corresponding segmentation mask, where each color correspond to a different instance. Let’s write a torch.utils.data.Dataset class for this dataset.
# load all image files, sorting them to # ensure that they are aligned # 通过排序确保图像和掩码文件一一对应 self.imgs = list(sorted(os.listdir(os.path.join(root, "PNGImages")))) self.masks = list(sorted(os.listdir(os.path.join(root, "PedMasks"))))
def__getitem__(self, idx): # load images ad masks # 加载图像和掩码 img_path = os.path.join(self.root, "PNGImages", self.imgs[idx]) mask_path = os.path.join(self.root, "PedMasks", self.masks[idx]) img = Image.open(img_path).convert("RGB") # note that we haven't converted the mask to RGB, # because each color corresponds to a different instance # with 0 being background # 其实也可以使用cv2.imread(mask_path, cv2.IMREAD_GRAYSCALE) mask = Image.open(mask_path) # convert the PIL Image into a numpy array mask = np.array(mask) # instances are encoded as different colors obj_ids = np.unique(mask) # first id is the background, so remove it # 第一个表示 obj_ids = obj_ids[1:]
# split the color-encoded mask into a set # of binary masks # 针对不同的行人实例创建对应的掩码 masks = mask == obj_ids[:, None, None]
# get bounding box coordinates for each mask # 计算每个掩码的边界框坐标 num_objs = len(obj_ids) boxes = [] for i inrange(num_objs): pos = np.where(masks[i]) xmin = np.min(pos[1]) xmax = np.max(pos[1]) ymin = np.min(pos[0]) ymax = np.max(pos[0]) boxes.append([xmin, ymin, xmax, ymax])
# convert everything into a torch.Tensor boxes = torch.as_tensor(boxes, dtype=torch.float32) # there is only one class labels = torch.ones((num_objs,), dtype=torch.int64) masks = torch.as_tensor(masks, dtype=torch.uint8)
image_id = torch.tensor([idx]) area = (boxes[:, 3] - boxes[:, 1]) * (boxes[:, 2] - boxes[:, 0]) # suppose all instances are not crowd iscrowd = torch.zeros((num_objs,), dtype=torch.int64)
if self.transforms isnotNone: img, target = self.transforms(img, target)
return img, target
def__len__(self): returnlen(self.imgs)
That’s all for the dataset. Now let’s define a model that can perform predictions on this dataset.
上述就是自定义数据类。下面定义一个模型,在上述数据集上进行预测
Defining your model
定义模型
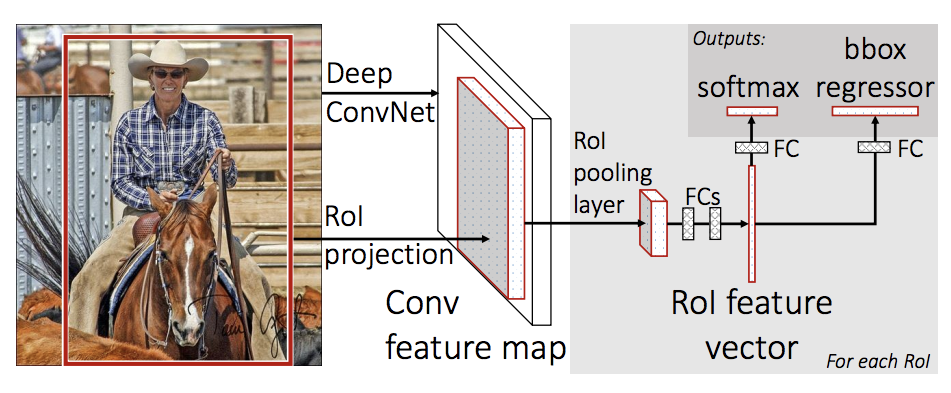
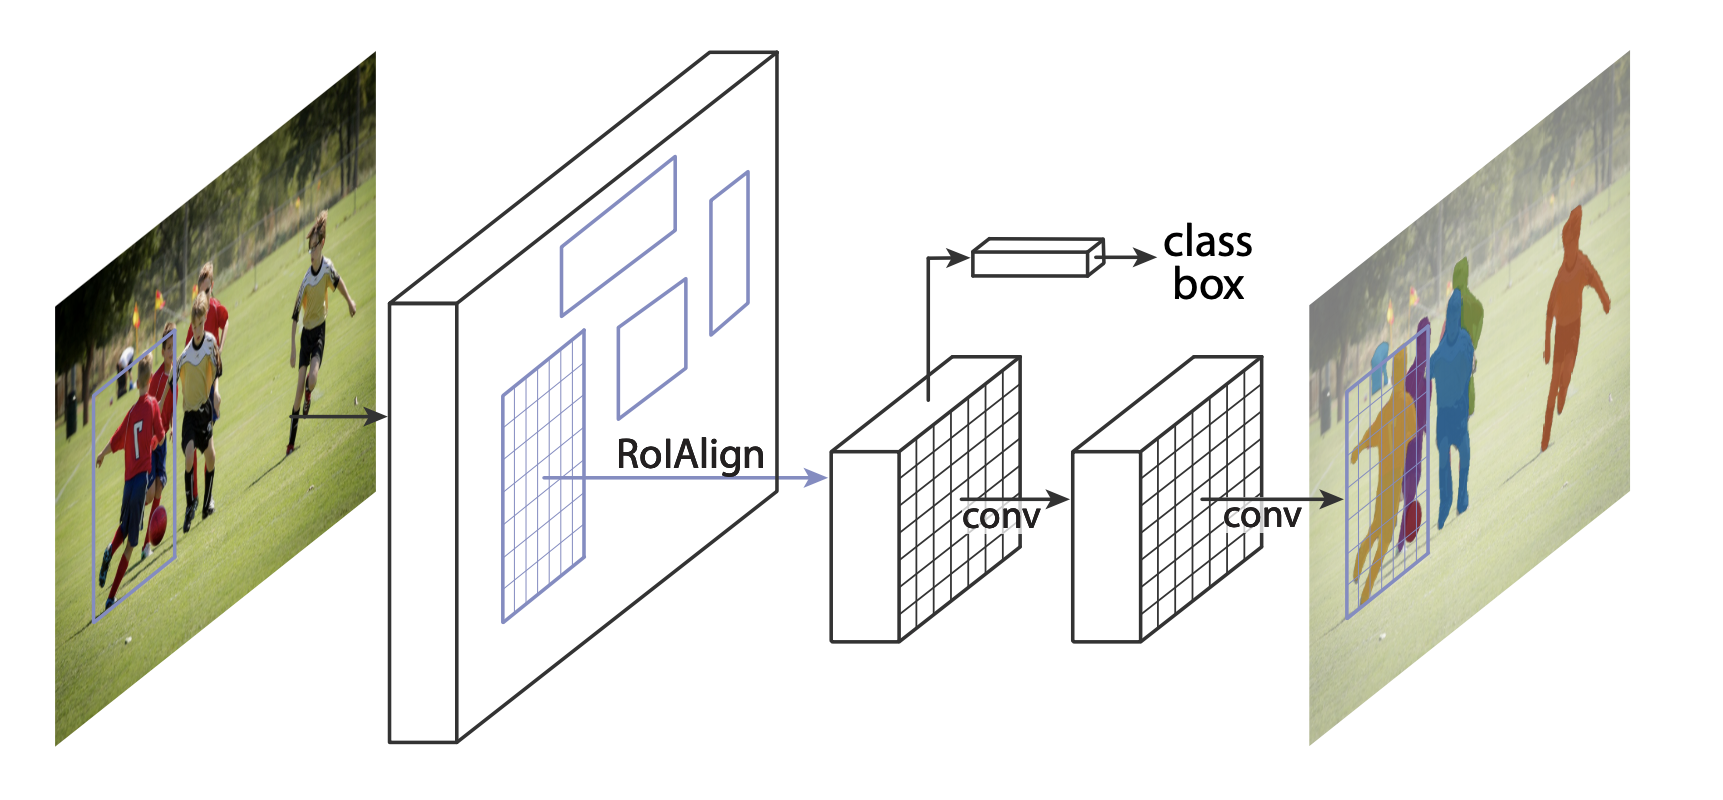
In this tutorial, we will be using Mask R-CNN, which is based on top of Faster R-CNN. Faster R-CNN is a model that predicts both bounding boxes and class scores for potential objects in the image.
There are two common situations where one might want to modify one of the available models in torchvision modelzoo. The first is when we want to start from a pre-trained model, and just finetune the last layer. The other is when we want to replace the backbone of the model with a different one (for faster predictions, for example).
Let’s go see how we would do one or another in the following sections.
让我们来看看在接下来的几节中会如何做
1 - Finetuning from a pretrained model
1 - 对预处理模型进行微调
Let’s suppose that you want to start from a model pre-trained on COCO and want to finetune it for your particular classes. Here is a possible way of doing it:
假设您想从一个在COCO上预训练的模型开始,并想针对特定类对其进行微调。这里有一个可行的方法:
1 2 3 4 5 6 7 8 9 10 11 12 13 14 15 16
import torchvision from torchvision.models.detection.faster_rcnn import FastRCNNPredictor
# load a model pre-trained pre-trained on COCO # 加载在COCO上预训练的模型 model = torchvision.models.detection.fasterrcnn_resnet50_fpn(pretrained=True)
# replace the classifier with a new one, that has # num_classes which is user-defined # 替换新的分类器 num_classes = 2# 1 class (person) + background # get number of input features for the classifier # 获取分类器的输入特征数 in_features = model.roi_heads.box_predictor.cls_score.in_features # replace the pre-trained head with a new one model.roi_heads.box_predictor = FastRCNNPredictor(in_features, num_classes)
2 - Modifying the model to add a different backbone
import torchvision
from torchvision.models.detection import FasterRCNN
from torchvision.models.detection.rpn import AnchorGenerator

# load a pre-trained model for classification and return
# only the features
backbone = torchvision.models.mobilenet_v2(pretrained=True).features
# FasterRCNN needs to know the number of
# output channels in a backbone. For mobilenet_v2, it's 1280
# so we need to add it here
backbone.out_channels = 1280

# let's make the RPN generate 5 x 3 anchors per spatial
# location, with 5 different sizes and 3 different aspect
# ratios. We have a Tuple[Tuple[int]] because each feature
# map could potentially have different sizes and
# aspect ratios
anchor_generator = AnchorGenerator(sizes=((32, 64, 128, 256, 512),),
                                   aspect_ratios=((0.5, 1.0, 2.0),))

# let's define what are the feature maps that we will
# use to perform the region of interest cropping, as well as
# the size of the crop after rescaling.
# if your backbone returns a Tensor, featmap_names is expected to
# be [0]. More generally, the backbone should return an
# OrderedDict[Tensor], and in featmap_names you can choose which
# feature maps to use.
roi_pooler = torchvision.ops.MultiScaleRoIAlign(featmap_names=[0],
                                                output_size=7,
                                                sampling_ratio=2)

# put the pieces together inside a FasterRCNN model
model = FasterRCNN(backbone,
                   num_classes=2,
                   rpn_anchor_generator=anchor_generator,
                   box_roi_pool=roi_pooler)
An Instance segmentation model for PennFudan Dataset
PennFudan数据集的实例分割模型
In our case, we want to fine-tune from a pre-trained model, given that our dataset is very small, so we will be following approach number 1.
在我们的例子中,我们希望从预先训练好的模型中进行微调,因为我们的数据集非常小,所以我们将遵循方法1
Here we want to also compute the instance segmentation masks, so we will be using Mask R-CNN:
import torchvision
from torchvision.models.detection.faster_rcnn import FastRCNNPredictor
from torchvision.models.detection.mask_rcnn import MaskRCNNPredictor


def get_model_instance_segmentation(num_classes):
    # load an instance segmentation model pre-trained pre-trained on COCO
    model = torchvision.models.detection.maskrcnn_resnet50_fpn(pretrained=True)

    # get number of input features for the classifier
    in_features = model.roi_heads.box_predictor.cls_score.in_features
    # replace the pre-trained head with a new one
    model.roi_heads.box_predictor = FastRCNNPredictor(in_features, num_classes)

    # now get the number of input features for the mask classifier
    in_features_mask = model.roi_heads.mask_predictor.conv5_mask.in_channels
    hidden_layer = 256
    # and replace the mask predictor with a new one
    model.roi_heads.mask_predictor = MaskRCNNPredictor(in_features_mask,
                                                       hidden_layer,
                                                       num_classes)

    return model
That’s it, this will make model be ready to be trained and evaluated on your custom dataset.
上述代码就能够实现自定义数据集的训练和评估
Putting everything together
完整实现
In references/detection/, we have a number of helper functions to simplify training and evaluating detection models. Here, we will use references/detection/engine.py, references/detection/utils.py and references/detection/transforms.py. Just copy them to your folder and use them here.
Before iterating over the dataset, it’s good to see what the model expects during training and inference time on sample data.
在迭代数据集之前,最好能知道模型在样本数据的训练和推理时中需要什么
1 2 3 4 5 6 7 8 9 10 11 12 13 14
model = torchvision.models.detection.fasterrcnn_resnet50_fpn(pretrained=True) dataset = PennFudanDataset('PennFudanPed', get_transform(train=True)) data_loader = torch.utils.data.DataLoader( dataset, batch_size=2,shuffle=True,num_workers=4, collate_fn=utils.collate_fn) # For Training images,targets = next(iter(data_loader)) images = list(image for image in images) targets = [{k: v for k, v in t.items()} for t in targets] output = model(images,targets) # Returns losses and detections # For inference model.eval() x = [torch.rand(3, 300, 400), torch.rand(3, 500, 400)] predictions = model(x) # Returns predictions
Let’s now write the main function which performs the training and the validation:
from engine import train_one_epoch, evaluate import utils
def main(): # train on the GPU or on the CPU, if a GPU is not available device = torch.device('cuda') if torch.cuda.is_available() else torch.device('cpu')
# our dataset has two classes only - background and person num_classes = 2 # use our dataset and defined transformations dataset = PennFudanDataset('PennFudanPed', get_transform(train=True)) dataset_test = PennFudanDataset('PennFudanPed', get_transform(train=False))
# split the dataset in train and test set indices = torch.randperm(len(dataset)).tolist() dataset = torch.utils.data.Subset(dataset, indices[:-50]) dataset_test = torch.utils.data.Subset(dataset_test, indices[-50:])
# define training and validation data loaders data_loader = torch.utils.data.DataLoader( dataset, batch_size=2,shuffle=True,num_workers=4, collate_fn=utils.collate_fn)
# get the model using our helper function model = get_model_instance_segmentation(num_classes)
# move model to the right device model.to(device)
# construct an optimizer params = [p for p in model.parameters() if p.requires_grad] optimizer = torch.optim.SGD(params, lr=0.005, momentum=0.9,weight_decay=0.0005) # and a learning rate scheduler lr_scheduler = torch.optim.lr_scheduler.StepLR(optimizer, step_size=3, gamma=0.1)
# let's train it for 10 epochs num_epochs = 10
for epoch in range(num_epochs): # train for one epoch, printing every 10 iterations train_one_epoch(model, optimizer, data_loader, device, epoch, print_freq=10) # update the learning rate lr_scheduler.step() # evaluate on the test dataset evaluate(model, data_loader_test, device=device)
IoU metric: bbox
 Average Precision  (AP) @[ IoU=0.50:0.95 | area=   all | maxDets=100 ] = 0.799
 Average Precision  (AP) @[ IoU=0.50      | area=   all | maxDets=100 ] = 0.969
 Average Precision  (AP) @[ IoU=0.75      | area=   all | maxDets=100 ] = 0.935
 Average Precision  (AP) @[ IoU=0.50:0.95 | area= small | maxDets=100 ] = 0.349
 Average Precision  (AP) @[ IoU=0.50:0.95 | area=medium | maxDets=100 ] = 0.592
 Average Precision  (AP) @[ IoU=0.50:0.95 | area= large | maxDets=100 ] = 0.831
 Average Recall     (AR) @[ IoU=0.50:0.95 | area=   all | maxDets=  1 ] = 0.324
 Average Recall     (AR) @[ IoU=0.50:0.95 | area=   all | maxDets= 10 ] = 0.844
 Average Recall     (AR) @[ IoU=0.50:0.95 | area=   all | maxDets=100 ] = 0.844
 Average Recall     (AR) @[ IoU=0.50:0.95 | area= small | maxDets=100 ] = 0.400
 Average Recall     (AR) @[ IoU=0.50:0.95 | area=medium | maxDets=100 ] = 0.777
 Average Recall     (AR) @[ IoU=0.50:0.95 | area= large | maxDets=100 ] = 0.870
IoU metric: segm
 Average Precision  (AP) @[ IoU=0.50:0.95 | area=   all | maxDets=100 ] = 0.761
 Average Precision  (AP) @[ IoU=0.50      | area=   all | maxDets=100 ] = 0.969
 Average Precision  (AP) @[ IoU=0.75      | area=   all | maxDets=100 ] = 0.919
 Average Precision  (AP) @[ IoU=0.50:0.95 | area= small | maxDets=100 ] = 0.341
 Average Precision  (AP) @[ IoU=0.50:0.95 | area=medium | maxDets=100 ] = 0.464
 Average Precision  (AP) @[ IoU=0.50:0.95 | area= large | maxDets=100 ] = 0.788
 Average Recall     (AR) @[ IoU=0.50:0.95 | area=   all | maxDets=  1 ] = 0.303
 Average Recall     (AR) @[ IoU=0.50:0.95 | area=   all | maxDets= 10 ] = 0.799
 Average Recall     (AR) @[ IoU=0.50:0.95 | area=   all | maxDets=100 ] = 0.799
 Average Recall     (AR) @[ IoU=0.50:0.95 | area= small | maxDets=100 ] = 0.400
 Average Recall     (AR) @[ IoU=0.50:0.95 | area=medium | maxDets=100 ] = 0.769
 Average Recall     (AR) @[ IoU=0.50:0.95 | area= large | maxDets=100 ] = 0.818
But what do the predictions look like? Let’s take one image in the dataset and verify
实际预测是什么样的呢?使用一张图像进行验证
The trained model predicts 9 instances of person in this image, let’s see a couple of them:
经过训练的模型预测了该图像中的9个人物实例,让我们来看看其中的几个:
The results look pretty good!
结果确实很好!
Wrapping up
小结
In this tutorial, you have learned how to create your own training pipeline for instance segmentation models, on a custom dataset. For that, you wrote a torch.utils.data.Dataset class that returns the images and the ground truth boxes and segmentation masks. You also leveraged a Mask R-CNN model pre-trained on COCO train2017 in order to perform transfer learning on this new dataset.
For a more complete example, which includes multi-machine / multi-gpu training, check references/detection/train.py, which is present in the torchvision repo.