[译]Writing Custom Datasets, DataLoaders and Transforms

PyTorch通过TorchVision工具包提供统一的数据加载、数据处理的接口,允许自定义类的方式加载数据集,通过DataLoader接口来批量处理

原文地址:Writing Custom Datasets, DataLoaders and Transforms

A lot of effort in solving any machine learning problem goes in to preparing the data. PyTorch provides many tools to make data loading easy and hopefully, to make your code more readable. In this tutorial, we will see how to load and preprocess/augment data from a non trivial dataset.

在解决任何机器学习问题时,都要花很多精力准备数据。PyTorch提供了许多工具来使数据加载变得容易,并且有可能使您的代码更具可读性。在本教程中,我们将看到如何从一个自定义数据集中加载和预处理/扩充数据

To run this tutorial, please make sure the following packages are installed: * scikit-image: For image io and transforms * pandas: For easier csv parsing

运行本教程之前,确保以下包已安装:

  • scikit-image: 用于图像输出和转换
  • pandas: 用于CSV文件解析
1
2
3
4
5
6
7
8
9
10
11
12
13
14
15
from __future__ import print_function, division
import os
import torch
import pandas as pd
from skimage import io, transform
import numpy as np
import matplotlib.pyplot as plt
from torch.utils.data import Dataset, DataLoader
from torchvision import transforms, utils

# Ignore warnings
import warnings
warnings.filterwarnings("ignore")

plt.ion() # interactive mode

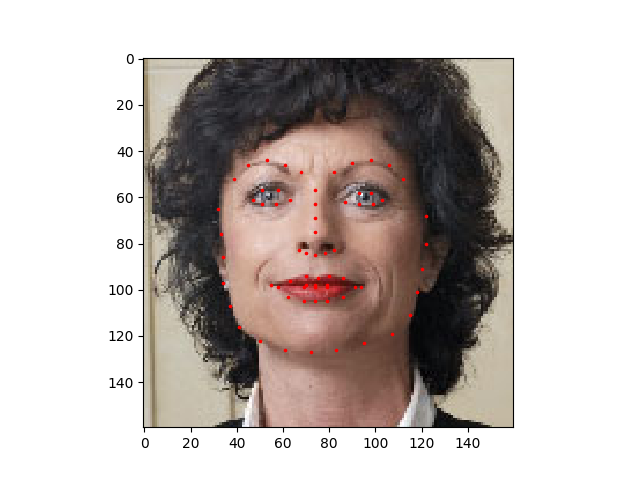
The dataset we are going to deal with is that of facial pose. This means that a face is annotated like this:

我们将要处理的数据集是面部姿态数据集。这意味着一张脸被这样标注:

Over all, 68 different landmark points are annotated for each face.

总的来说,为每张脸标注了68个不同的地点

Download the dataset from here so that the images are in a directory named 'data/faces/'. This dataset was actually generated by applying excellent dlib's pose estimation on a few images from imagenet tagged as 'face'

从这里下载数据集,以便图像位于名为“data/faces/”的目录中(就是解压后放置在data/faces目录下)。这个数据集实际上是通过对标记为“人脸”的imagenet中的图像应用出色的dlib姿态估计方法生成的

Dataset comes with a csv file with annotations which looks like this:

数据集附带一个csv文件,其格式如下(第一行为注释信息,第二行开始是图像名及标注坐标):

1
2
3
image_name,part_0_x,part_0_y,part_1_x,part_1_y,part_2_x,part_2_y,part_3_x,part_3_y,...
0805personali01.jpg,27,83,27,98,29,113,33,127,39,139,49,150,60,159,73,166,87,168,100,166,...
10comm-decarlo.jpg,66,114,65,128,67,142,68,156,72,169,80,180,91,...

Let's quickly read the CSV and get the annotations in an (N, 2) array where N is the number of landmarks.

让我们快速阅读CSV并将标注地点保存在(N,2)大小数组,其中N是标注的数量

1
2
3
4
5
6
7
8
9
10
landmarks_frame = pd.read_csv('data/faces/face_landmarks.csv')

n = 65
img_name = landmarks_frame.iloc[n, 0]
landmarks = landmarks_frame.iloc[n, 1:].as_matrix()
landmarks = landmarks.astype('float').reshape(-1, 2)

print('Image name: {}'.format(img_name))
print('Landmarks shape: {}'.format(landmarks.shape))
print('First 4 Landmarks: {}'.format(landmarks[:4]))

输出

1
2
3
4
5
6
Image name: person-7.jpg
Landmarks shape: (68, 2)
First 4 Landmarks: [[32. 65.]
[33. 76.]
[34. 86.]
[34. 97.]]

Let's write a simple helper function to show an image and its landmarks and use it to show a sample.

让我们编写一个简单的辅助函数来显示图像及其标注,并显示该结果

1
2
3
4
5
6
7
8
9
10
def show_landmarks(image, landmarks):
"""Show image with landmarks"""
plt.imshow(image)
plt.scatter(landmarks[:, 0], landmarks[:, 1], s=10, marker='.', c='r')
# 这一行代码需要去除 plt.pause(0.001) # pause a bit so that plots are updated

plt.figure()
show_landmarks(io.imread(os.path.join('data/faces/', img_name)),
landmarks)
plt.show()

Dataset Class

torch.utils.data.Dataset is an abstract class representing a dataset. Your custom dataset should inherit Dataset and override the following methods: * __len__ so that len(dataset) returns the size of the dataset. * __getitem__ to support the indexing such that dataset[i] can be used to get ith sample

torch.util.data.Dataset是表示数据集的抽象类。自定义数据集类必须继承该类并重写以下方法:

  • __len__:返回数据集个数
  • __getitem__:支持数据集检索,返回指定的图像

Let's create a dataset class for our face landmarks dataset. We will read the csv in __init__ but leave the reading of images to __getitem__. This is memory efficient because all the images are not stored in the memory at once but read as required.

创建人脸标注数据集类。在__init__方法中读取CSV文件,在__getItem__方法中读取图像。这种方式更有效率,因为不需要一次性读取所有的图像

Sample of our dataset will be a dict {'image': image, 'landmarks': landmarks}. Our dataset will take an optional argument transform so that any required processing can be applied on the sample. We will see the usefulness of transform in the next section.

数据集中每个样本的格式为dict - {'image': image, 'landmarks': landmarks}。数据集类设置一个可选参数transform,作为参数转换,以便对样本应用任何所需的处理。我们将在下一节看到这个参数的操作

1
2
3
4
5
6
7
8
9
10
11
12
13
14
15
16
17
18
19
20
21
22
23
24
25
26
27
28
29
30
31
32
33
34
class FaceLandmarksDataset(Dataset):
"""Face Landmarks dataset."""

def __init__(self, csv_file, root_dir, transform=None):
"""
Args:
csv_file (string): Path to the csv file with annotations.
root_dir (string): Directory with all the images.
transform (callable, optional): Optional transform to be applied
on a sample.
"""
self.landmarks_frame = pd.read_csv(csv_file)
self.root_dir = root_dir
self.transform = transform

def __len__(self):
return len(self.landmarks_frame)

def __getitem__(self, idx):
if torch.is_tensor(idx):
idx = idx.tolist()

img_name = os.path.join(self.root_dir,
self.landmarks_frame.iloc[idx, 0])
image = io.imread(img_name)
landmarks = self.landmarks_frame.iloc[idx, 1:]
landmarks = np.array([landmarks])
landmarks = landmarks.astype('float').reshape(-1, 2)
sample = {'image': image, 'landmarks': landmarks}

if self.transform:
sample = self.transform(sample)

return sample

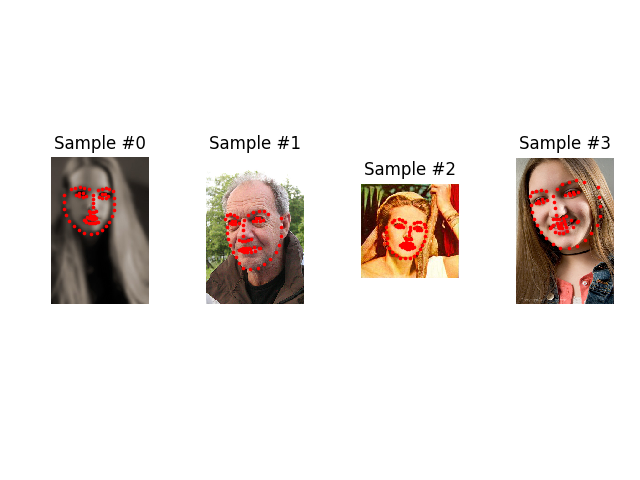
Let's instantiate this class and iterate through the data samples. We will print the sizes of first 4 samples and show their landmarks.

让我们实例化这个类并遍历数据样本。我们将打印前4个样本的尺寸,并显示它们的标注信息

1
2
3
4
5
6
7
8
9
10
11
12
13
14
15
16
17
18
19
face_dataset = FaceLandmarksDataset(csv_file='data/faces/face_landmarks.csv',
root_dir='data/faces/')

fig = plt.figure()

for i in range(len(face_dataset)):
sample = face_dataset[i]

print(i, sample['image'].shape, sample['landmarks'].shape)

ax = plt.subplot(1, 4, i + 1)
plt.tight_layout()
ax.set_title('Sample #{}'.format(i))
ax.axis('off')
show_landmarks(**sample)

if i == 3:
plt.show()
break

输出

1
2
3
4
0 (324, 215, 3) (68, 2)
1 (500, 333, 3) (68, 2)
2 (250, 258, 3) (68, 2)
3 (434, 290, 3) (68, 2)

Transforms

转换

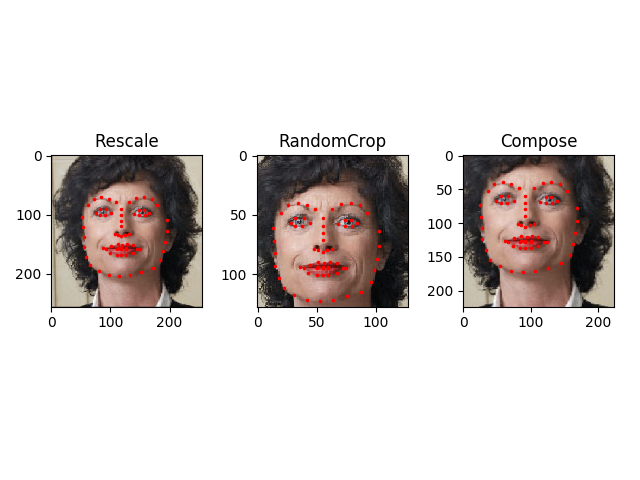
One issue we can see from the above is that the samples are not of the same size. Most neural networks expect the images of a fixed size. Therefore, we will need to write some prepocessing code. Let's create three transforms: * Rescale: to scale the image * RandomCrop: to crop from image randomly. This is data augmentation. * ToTensor: to convert the numpy images to torch images (we need to swap axes).

从上面我们可以看到的一个问题是样本的大小不同。大多数神经网络期望图像的大小是固定的。因此,我们需要编写一些预处理代码。让我们创建三个转换:

  • Rescale:缩放图像
  • RandomCrop:随机裁剪。作用于数据扩充
  • ToTensor:转换numpy格式图像到torch格式

We will write them as callable classes instead of simple functions so that parameters of the transform need not be passed everytime it's called. For this, we just need to implement __call__ method and if required,__init__ method. We can then use a transform like this:

我们将把它们写成可调用的类,而不是简单的函数,这样就不需要每次调用时都传递转换的参数。为此,我们只需要实现__call__方法,如果需要的话,还可以实现__init__方法。然后我们可以使用如下转换:

1
2
tsfm = Transform(params)
transformed_sample = tsfm(sample)

Observe below how these transforms had to be applied both on the image and landmarks.

下面观察这些变换是如何应用于图像和标注信息的

1
2
3
4
5
6
7
8
9
10
11
12
13
14
15
16
17
18
19
20
21
22
23
24
25
26
27
28
29
30
31
32
33
34
35
36
37
38
39
40
41
42
43
44
45
46
47
48
49
50
51
52
53
54
55
56
57
58
59
60
61
62
63
64
65
66
67
68
69
70
71
72
73
74
75
76
77
78
79
80
81
class Rescale(object):
"""Rescale the image in a sample to a given size.

Args:
output_size (tuple or int): Desired output size. If tuple, output is
matched to output_size. If int, smaller of image edges is matched
to output_size keeping aspect ratio the same.
"""

def __init__(self, output_size):
assert isinstance(output_size, (int, tuple))
self.output_size = output_size

def __call__(self, sample):
image, landmarks = sample['image'], sample['landmarks']

h, w = image.shape[:2]
if isinstance(self.output_size, int):
if h > w:
new_h, new_w = self.output_size * h / w, self.output_size
else:
new_h, new_w = self.output_size, self.output_size * w / h
else:
new_h, new_w = self.output_size

new_h, new_w = int(new_h), int(new_w)

img = transform.resize(image, (new_h, new_w))

# h and w are swapped for landmarks because for images,
# x and y axes are axis 1 and 0 respectively
landmarks = landmarks * [new_w / w, new_h / h]

return {'image': img, 'landmarks': landmarks}


class RandomCrop(object):
"""Crop randomly the image in a sample.

Args:
output_size (tuple or int): Desired output size. If int, square crop
is made.
"""

def __init__(self, output_size):
assert isinstance(output_size, (int, tuple))
if isinstance(output_size, int):
self.output_size = (output_size, output_size)
else:
assert len(output_size) == 2
self.output_size = output_size

def __call__(self, sample):
image, landmarks = sample['image'], sample['landmarks']

h, w = image.shape[:2]
new_h, new_w = self.output_size

top = np.random.randint(0, h - new_h)
left = np.random.randint(0, w - new_w)

image = image[top: top + new_h,
left: left + new_w]

landmarks = landmarks - [left, top]

return {'image': image, 'landmarks': landmarks}


class ToTensor(object):
"""Convert ndarrays in sample to Tensors."""

def __call__(self, sample):
image, landmarks = sample['image'], sample['landmarks']

# swap color axis because
# numpy image: H x W x C
# torch image: C X H X W
image = image.transpose((2, 0, 1))
return {'image': torch.from_numpy(image),
'landmarks': torch.from_numpy(landmarks)}

Compose transforms

组合转换

Now, we apply the transforms on a sample.

现在将转换操作应用到样本中

Let's say we want to rescale the shorter side of the image to 256 and then randomly crop a square of size 224 from it. i.e, we want to compose Rescale and RandomCrop transforms. torchvision.transforms.Compose is a simple callable class which allows us to do this.

假设我们想将图像的短边重新缩放到256,然后从中随机裁剪一个224大小的正方形。比如,我们想要组合Rescale和RandomCrop转换操作。可以通过torchvision.transforms.Compose实现

1
2
3
4
5
6
7
8
9
10
11
12
13
14
15
16
17
scale = Rescale(256)
crop = RandomCrop(128)
composed = transforms.Compose([Rescale(256),
RandomCrop(224)])

# Apply each of the above transforms on sample.
fig = plt.figure()
sample = face_dataset[65]
for i, tsfrm in enumerate([scale, crop, composed]):
transformed_sample = tsfrm(sample)

ax = plt.subplot(1, 3, i + 1)
plt.tight_layout()
ax.set_title(type(tsfrm).__name__)
show_landmarks(**transformed_sample)

plt.show()

Iterating through the dataset

数据集迭代

Let's put this all together to create a dataset with composed transforms. To summarize, every time this dataset is sampled: * An image is read from the file on the fly * Transforms are applied on the read image * Since one of the transforms is random, data is augmentated on sampling

让我们把这些放在一起,创建一个具有组合转换的数据集。总而言之,每次对该数据集进行采样时:

  • 从文件中动态读取图像
  • 对读取的图像应用变换
  • 因为其中一个变换是随机的,所以数据在采样时被扩充了

We can iterate over the created dataset with a for i in range loop as before.

之前我们可以通过for i in range方式来完成

1
2
3
4
5
6
7
8
9
10
11
12
13
14
15
transformed_dataset = FaceLandmarksDataset(csv_file='data/faces/face_landmarks.csv',
root_dir='data/faces/',
transform=transforms.Compose([
Rescale(256),
RandomCrop(224),
ToTensor()
]))

for i in range(len(transformed_dataset)):
sample = transformed_dataset[i]

print(i, sample['image'].size(), sample['landmarks'].size())

if i == 3:
break

输出

1
2
3
4
0 torch.Size([3, 224, 224]) torch.Size([68, 2])
1 torch.Size([3, 224, 224]) torch.Size([68, 2])
2 torch.Size([3, 224, 224]) torch.Size([68, 2])
3 torch.Size([3, 224, 224]) torch.Size([68, 2])

However, we are losing a lot of features by using a simple for loop to iterate over the data. In particular, we are missing out on: * Batching the data * Shuffling the data * Load the data in parallel using multiprocessing workers.

然而,通过使用一个简单的for循环来迭代数据会丢失很多特性。特别是我们错过了:

  • 批量处理数据
  • 打乱数据
  • 使用多处理器并行加载数据

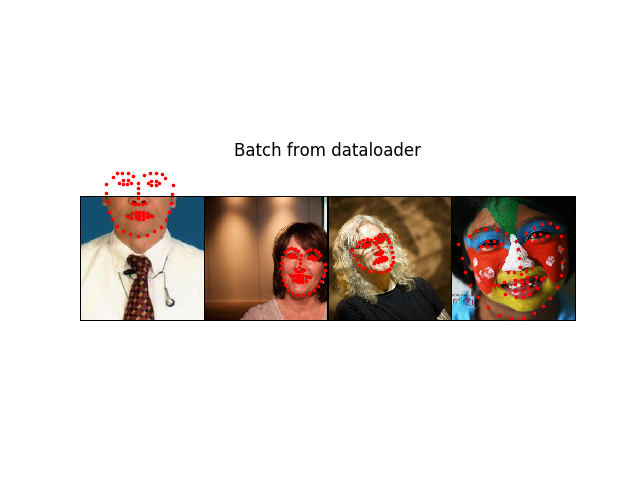
torch.utils.data.DataLoader is an iterator which provides all these features. Parameters used below should be clear. One parameter of interest is collate_fn. You can specify how exactly the samples need to be batched using collate_fn. However, default collate should work fine for most use cases.

torch.utils.data.DataLoader是一个迭代器,能够提供上述所有的特性。感兴趣的一个参数是collate_fn。您可以使用collate_fn指定如何批量化样本集,默认设置已经能够很好的作用于大多数情况了

1
2
3
4
5
6
7
8
9
10
11
12
13
14
15
16
17
18
19
20
21
22
23
24
25
26
27
28
29
30
31
32
33
34
35
dataloader = DataLoader(transformed_dataset, batch_size=4,
shuffle=True, num_workers=4)


# Helper function to show a batch
def show_landmarks_batch(sample_batched):
"""Show image with landmarks for a batch of samples."""
images_batch, landmarks_batch = \
sample_batched['image'], sample_batched['landmarks']
batch_size = len(images_batch)
im_size = images_batch.size(2)
grid_border_size = 2

grid = utils.make_grid(images_batch)
plt.imshow(grid.numpy().transpose((1, 2, 0)))

for i in range(batch_size):
plt.scatter(landmarks_batch[i, :, 0].numpy() + i * im_size + (i + 1) * grid_border_size,
landmarks_batch[i, :, 1].numpy() + grid_border_size,
s=10, marker='.', c='r')

plt.title('Batch from dataloader')

for i_batch, sample_batched in enumerate(dataloader):
print(i_batch, sample_batched['image'].size(),
sample_batched['landmarks'].size())

# observe 4th batch and stop.
if i_batch == 3:
plt.figure()
show_landmarks_batch(sample_batched)
plt.axis('off')
plt.ioff()
plt.show()
break

输出

1
2
3
4
0 torch.Size([4, 3, 224, 224]) torch.Size([4, 68, 2])
1 torch.Size([4, 3, 224, 224]) torch.Size([4, 68, 2])
2 torch.Size([4, 3, 224, 224]) torch.Size([4, 68, 2])
3 torch.Size([4, 3, 224, 224]) torch.Size([4, 68, 2])

Afterword: torchvision

后记:torchvision

In this tutorial, we have seen how to write and use datasets, transforms and dataloader. torchvision package provides some common datasets and transforms. You might not even have to write custom classes. One of the more generic datasets available in torchvision is ImageFolder. It assumes that images are organized in the following way:

在本教程中,我们已经看到了如何编写和使用数据集、转换和数据加载器。torchvision包提供了一些常见的数据集和转换。你甚至不必编写自定义类。在torchvision中最通用的数据集之一是ImageFolder。它假设图像以下列方式组织:

1
2
3
4
5
6
7
8
9
root/ants/xxx.png
root/ants/xxy.jpeg
root/ants/xxz.png
.
.
.
root/bees/123.jpg
root/bees/nsdf3.png
root/bees/asd932_.png

where 'ants', 'bees' etc. are class labels. Similarly generic transforms which operate on PIL.Image like RandomHorizontalFlip, Scale, are also available. You can use these to write a dataloader like this:

其中antsbees是类标签。里面集成了通用的转换操作,比如RandomHorizontalFlip/Scale等等。您可以使用这些来编写如下数据加载器:

1
2
3
4
5
6
7
8
9
10
11
12
13
14
15
import torch
from torchvision import transforms, datasets

data_transform = transforms.Compose([
transforms.RandomSizedCrop(224),
transforms.RandomHorizontalFlip(),
transforms.ToTensor(),
transforms.Normalize(mean=[0.485, 0.456, 0.406],
std=[0.229, 0.224, 0.225])
])
hymenoptera_dataset = datasets.ImageFolder(root='hymenoptera_data/train',
transform=data_transform)
dataset_loader = torch.utils.data.DataLoader(hymenoptera_dataset,
batch_size=4, shuffle=True,
num_workers=4)